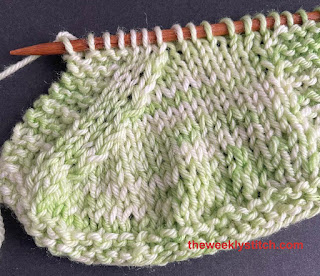
There is some curl since this is worked on a background of reverse stocking stitch. You may want to consider adding a border depending on how you plan to use the stitch.
Multiple of 10 + 3
Row 1: p4 *k5, p5; rep from *, end p4
Rows 2 and 4: k4 *p5, k5; rep from *, end k4
Row 3: p3 *p next st and leave on left needle, kbl of same st and drop from needle, k1, p3tog, kfb next st, p4
P3tog is used in some of my stitch videos, so I thought I'd share a separate video of how to work this right leaning double decrease, along with an easy alternative.
P3tog (purl three together) is a double decrease that presents as right leaning on the right side of the work. It can be a bit fiddly getting your needle into three stitches at once; needles with a pointy tip can be helpful, as can using a yarn made from fiber that has elasticity (wool). Scooting the stitches near the tip of the needle can also help.
An easy alternative is to slip two stitches purlwise to the right needle, purl the next stitch, then pass the two slipped stitches over the purl stitch.
Multiple of 4 Row 1: (WS) *(k1,yo,k1) into same st, p3tog Row 2: *p1, k3 Row 3: *p3tog, (k1,yo,k1) into same st Row 4: *k3, p1 Repeat these 4 rows for the pattern. Happy Knitting!
Sample knit with Patons Grace Cotton Yarn on US 6 Knitter's Pride Nova Cubics
Multiple of 4 + 1
Row 1: (RS) k1 *p3tog, leaving sts on needle, k3tog, leaving sts on needle, then p3tog once more before slipping sts off needle, k1. Repeat from * to end
To make the knots: Purl 3 together, leaving them on the left needle. Knit same 3 together, and Purl same 3 together again before dropping from left needle
Row 1: Knit
Row 2: Purl
Row 3: K1 *Make knot, K3* repeat from * to last 4 stitches, make knot, K1
Row 4: Purl
Row 5: Knit
Row 6: Purl
Row 7: K4 *Make knot, K3* repeat from * to last stitch, K1
Row 8: Purl
Sample knit with Rowan Kid Classic on US size 8 needles
I love this stitch!
I always encourage knitters, both new and old, to step outside their comfort zone. This is one of those stitches. It is challenging, but I wouldn't say hard. A bit tricky, yes. Hard, no.
Truly, it is not hard, but may take a little practice and extra effort if you aren't familiar with some of the steps. The one that might cause the most trouble is the purl 2 together through the back loop. If you can purl one through the back loop, you can do two. I have a separate video for that HERE, if you have never done it before. The other tricky bit is purling 3 together. If you can purl, you can purl two together, and if you can purl two together, you can do three! If you find it hard because you are a tight knitter, loosening up on the row prior will help, as will using a pointy tip needle.
Special Abbreviations in this stitch:
P2tog tbl = purl the next two stitches together through the back loop.
P3tog = purl the next three stitches together as if they were one
PSSO = pass the slipped stitch over the stitch just knit
Sl = slip the next stitch to the right needle without working it
Sample knit with worsted weight yarn on US Size 11 needles, Knitter's Pride Cubics
I first did a video on this stitch back in 2009 with my old digital camera. Since then, it has had over 2 million views. Yes, two million! I only demonstrated the k/p/k and p3tog parts of the stitch.
This is also the same as Trinity Stitch, which you will find in several stitch pattern books. Barbara Walker's First Treasury omits the +2 from the pattern, though.
This new video is HD, and shows the entire stitch.
Multiple of 4 + 2
Rows 1 and 3: Purl all stitches
Row 2: K1 *(K1, P1, K1) into next stitch, P3tog* K1
Row 4: K1 *P3tog, (K1, P1, K1) into next stitch* K1
Sample knit with DAZZLE Sock/Sport 100% British Blue Faced Leicester on US Size 4 needles
First let me say that this yarn is fabulous! I have 5 skeins of this, and it is going to be used for something special! This was my first experience with Blue Faced Leicester - I highly recommend it! It is so soft, so smooshy, and very easy to work with.
Moving on, this is a delicate, lovely little stitch that is super simple to knit. The only thing you may pause over is the purl 3 together in the third row. Don't worry - you can do it! If you are a tight knitter, work Row 2 a tad loose if you can. Or, gently wiggle your needle after you have inserted it into the 3 stitches to loosen them up a bit to help you purl them together.
Sample knit with Red Heart worsted, US Size 9 needles
This is another simple pattern - only 2 rows so it is very easy to remember too. The only thing you may find hard about this stitch is the purl 3 together, knit 3 together, purl 3 together into the same stitch. I have a couple tips at the end of the video for this.
Work on a multiple of 4 + 1
Row 1: K1 *P3tog, leave sts on left needle, Knit same 3 sts together, Purl the same 3 sts together again, and drop from left needle, K1*
Row 2: Purl
Want a free pattern for a hat knit with this stitch? Click HERE to go to the Star Struck Hat pattern!
For Star Stitch, work with a multiple of 4 stitches, plus 1
To make the Stars, Purl 3 stitches together, leaving stitches on left needle; make a Yarn Over, and Purl the same 3 stitches together again, and then drop off left needle
Row 1: Knit all stitches (Right side of fabric)
Row 2: P1, *Make Star, P1* Repeat from * to end
Row3: Knit all stitches
Row 4: P3, Make Star, *P1, Make Star* Repeat from * to last 3 stitches, P3
Repeat these 4 rows for pattern.
Star Stitch in the Round:
To make the stars in the round - Knit 3 stitches together, leaving stitches on the left needle, Yarn Over, and Knit the same 3 stitches together again and drop from the left needle
Cast on a multiple of 4, place the stitch marker on your right needle and join to knit in the round, being careful that the stitches are not twisted
Round 1: Knit all stitches
Round 2: *Make Star, K1* - continue to end of round
Round 3: Knit all stitches
Round 4: Knit 2 *Make star, Knit 1* - continue to end of round. (You will only be knitting two at the beginning of this round. In all other instances, you will only knit 1) You will end the round by making a star; you will see that you have two stitches before your stitch marker, and one after the stitch marker. Slip two stitches to the right needle (slip purlwise so the stitches are not twisted), remove your stitch marker, and slip the two stitches back to the left needle. Now, make your star, and then slip one stitch back to the left needle, place the marker on the right needle. The marker will be back in the same position it was before you removed it to make the star and will correctly mark the end/beginning of the round.
Repeat Round 1-4 for pattern
As always, if you are a visual learner, here is a video demonstration of the stitch. Rows 1 and 3 are not shown in the video as they are just plain knit rows. Rows 2 and 4 are demonstrated to show you how to make the Stars. (This video demonstrates the flat stitch pattern)