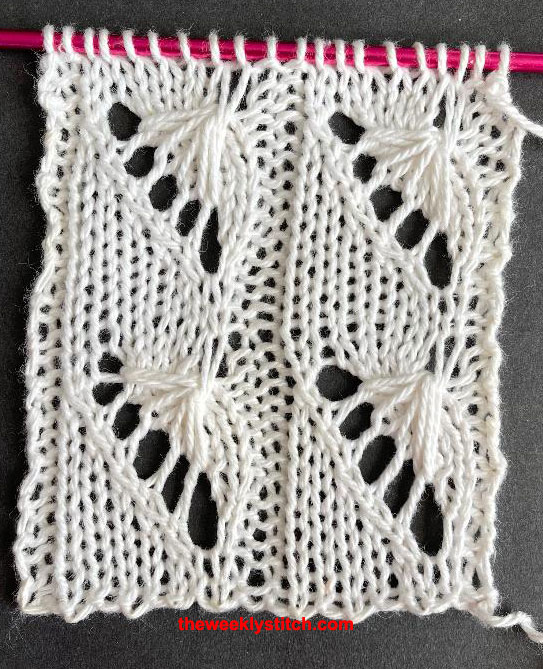
Sample knit with fingering weight yarn, US 7 needles
The back of this stitch pattern makes a neat bubble effect - good stitch for projects where the back will show.
Multiple of 4 + 3
**The yarn is to be held in back throughout the pattern when slipping stitches
Row 1 (rs): k2, p1 *yo, p4; end yo, p2, k2
Row 2: k3 *yo, sl 1 wyib, drop yo from previous row, k3
Row 3: k2, p1 *yo, slip both the yo and slipped st of previous row, p3; end p1, k2
Row 4: k3 *yo, slip 2 yo and slipped st of previous row, k3
Row 5: k2, p1 *yo, slip 3 yo and slipped st of previous row, p3; end p1, k2
Row 6: k3 *purl the four yo together and pull over the slipped st and off the left needle, then knit the slipped stitch, then with left needle pick up the four yo from the front and purl them together again, k3
Row 7: k2 *k2tog, p1, ssk, p1; end k2 instead of p1
Depending on how you plan to use this stitch, you may want to add one more more extra stitches at the beginning/end of each row to neaten things up, because in Row 2 you begin and end with a decrease. There is also a slight curl to the edges.
Multiple of 4 + 1
Row 1: purl
Row 2: k2tog *(k1, yo, k1) into same stitch, sl 1-k2tog-psso; repeat from *, end last repeat with (k, yo, k1) into same stitch, ssk
My sample was knit with some of my incredibly soft, smooth, fluffy must-have Silk Camel yarn on US Size 6 Nova Cubics. This yarn is my new love - I've kept a skein for myself and will be knitting something with it very soon! YUMMY, it is so exquisite!
I did things a little differently this week. I used a random stitch generator to get the stitch you see above. Pretty awesome, isn't it? This is the generator I used, but there are others out there. Google 'random stitch generator' or 'random lace generator' or a similar phrase and you'll find some. There are even cables! Lots of fun, I hope you try. And please stop by my Facebook page and share a picture of your own generated stitch!
For my stitch, I do recommend at least one extra stitch on each edge because there are yo's at the beginning of some rows; for a project using this stitch, a border would be nice.
Row 1: (RS) *k2, yo, ssk
Row 2 and all WS Rows: purl
Row 3: *yo, ssk, yo, k2tog
Row 5: *yo, k2tog, yo, k2tog
Row 7: *yo, ssk, ssk, yo -- you will have a double yarn over here, since the row begins and ends with a yo. When you come to this double yo on Row 8, you will p the first strand, and k the second strand.
Sample knit with Butterfly Cotton, US Size 5 addi Clicks
This stitch is my 'unvention'! I was playing around this morning, and this appeared on my needles. So I thought I would use it as the stitch for this week. It is very easy to knit, and you can do it with or without a cable needle. The cables are only 4 stitches, so I didn't bother with a cable needle. If anyone has seen this in a book, magazine, or elsewhere, feel free to let me know. I am sure someone at some point in knitting history has done this before :0)
This is a ten stitch pattern worked over eight rows.
For my sample, I worked with a total of twenty stitches - five extra on each side. Two of those are knit edge stitches, and three are used for the reverse stockinette background. You can use as many stitches as you like for the reverse stockinette background and edge stitches.
To make the right slanting cable:
Slip next two stitches to cable needle and hold in back of the work. Knit two from left needle, then knit two from cable needle.
Without a cable needle, slip next four stitches from left needle. With left needle, reach behind the last two stitches and slide the first two stitches back onto the left needle. Then grab the last two stitches and place them back on the left needle, knit all four stitches
To make the left slanting cable:
Slip next two stitches to cable needle and hold in front of the work. Knit two from left needle, then knit two from cable needle.
Without a cable needle, slip next four stitches from left needle. With left needle, reach in front of the last two stitches and slide the first two stitches back onto the left needle. Then grab the last two stitches and place them back on the left needle, knit all four stitches.
Below directions are for the cable itself. Add however many extra edge/background stitches you like for your project.
Abbreviations:
C2R = Make a right slanting cable
C2L = Make a left slanting cable
Row 1: (RS) C2R, YO, SSK, C2L
Row 2: Purl
Row 3: Knit
Row 4: Purl
Row 5: C2R, K2tog, YO, C2L
Rows 6, 7, 8: Repeat Rows 2, 3, and 4
Repeat these eight rows for the pattern.
I hope you all like my stitch. Here is the video (in which my little helper was very involved today). Happy Knitting, and Enjoy!
It has been a while since I posted a rib stitch, and this one is easy and so pretty.
SSK = Slip, Slip, Knit - Instructions for this decrease usually tell you to slip both stitches knitwise. I like to slip the first one knitwise, slip the second one purlwise and then knit them together. You can do whichever one you feel most comfortable with. You will get the same result, but for me slipping the second stitch purlwise makes it a little neater.
Sample knit with Patons Angora Bamboo on US 7 needles
Sample knit with Patons Lace on US 5 needles
This is a nice dainty pattern. I have two samples, just to show you what this looks like in different yarns. It is kind of hard to tell from the picture I guess :-). You are free to use any yarn you like of course, because if you like how it looks, then it is the right yarn. A swatch in the yarn you are thinking about will help you decide if you like how it looks or not. Me, I probably wouldn't use too heavy a yarn for this stitch, because I like how delicate it looks in a fine weight yarn. Even if you are new to lacy stitches, you can do this one. Don't be afraid to try, even if you have never knit lace before. Also, I would consider adding a few extra stitches for the sides, since this curls just a bit as all stockinette-y stitches do.
Special instructions:
Sl 2-K1-P2SSO = Slip the next two stitches together knitwise, knit 1, then pass both of the slipped stitches over the knit stitch at the same time. This makes a beautiful, centered double decrease.
Multiple of 8 + 5
Row 1 and all Odd Rows: Purl all stitches
Row 2: K4 *SSK, YO, K1, YO, K2tog, K3* K1
Row 4: K5 *YO, Sl 2-K1-P2SSO, YO, K5
Row 6: Same as Row 2
Row 8: SSK, YO, K1, YO, K2tog *K3, SSK, YO, K1, YO, K2tog
Row 10: K1 *YO, Sl 2-K1-P2SSO,YO, K5*, end last repeat with K1
Row 12: Same as Row 8
Repeat these 12 Rows for pattern
Want to add a bead to your eyelets? Place the beads on the purl rows after Rows 5 and 11, where the centered double decrease is worked. Purl up to the stitch that falls between the two yarn overs, place the bead on the stitch that was knit on the previous row, and continue to the end of the row. If you want more info on knitting with beads, look HERE.
Here is the video. Happy Knitting, and Enjoy! (The video does not show the bead addition, it is for the stitch only)
This sample knit as per pattern below, in Lily Sugar n Cream Cotton Yarn on US Size 6 needles
This sample was knit in Lily Sugar n Cream on US Size 9 needles, all in garter sitch
This sample was knit in Lily Sugar n Cream on US Size 10 needles, and I used a YO instead of KFB to increase
This stitch pattern was requested by one of my YouTube friends! Before I get into the details, I want to share a short story about this stitch pattern with you. Back when I first began knitting, I came across this particular stitch, I think on a website. The picture of the stitch did not show the points at the bottom of the fabric, just the middle of the sample. I did not know the stitch would cause the fabric to come to points, and so as I was knitting my scarf, and the points were forming, I was a little concerned but not much. I figured that I could block it into shape! (I don't know why I thought the fabric was not supposed to do this, but I did.) I was using a cheap acrylic yarn, and of course blocking did not help. So I decided to iron it instead. No matter how hard I tried, I could not get rid of those points! I did do a pretty good job of completely flattening the yarn though. I never wore the scarf, and am not even sure what ever happened to it. At some later time, I came across this stitch pattern again, where someone did show the points in their picture, and I felt like a complete idiot. So, just incase you, dear knitter, are not aware that this stitch pattern will produce lovely points on your fabric, I have made sure that the points are included in the sample pictures above.
Now. Here are the details. The instructions below will give you fabric that looks like the first picture, with the black and white yarn. You certainly are not limited to only two colors, or to switching colors after Row 4. Feel free to use as many or few colors as you like, and switch them as often as you like.
You may also see this stitch pattern named Afghan Stitch - there are a number of variations on this stitch pattern. Whatever you call it, or whatever particular method you use, you will end up with something that looks like the pictures above.
And I always assume that you will be watching the video, in which I usually tell you what the abbreviations are for, but if not:
KFB = Knit into the front and back of the next stitch
SSK = Slip the next two stitches knitwise, one at a time, and then knit them together through the back loop. I actually like to slip the second stitch purlwise, but most of the time patterns will instruct you to slip both knitwise. Either way will work, but I find that by slipping the second stitch purlwise, it makes the stitches a bit neater
K2tog = Knit the next two stitches together as if they were one
Cast on a multiple of 14 + 2
Rows 1 and 3: Purl all stitches
Rows 2 and 4: K1, KFB, K4, SSK, K2tog, K4 *KFB, KFB, K4, SSK, K2tog, K4* Repeat from * to last 2 stitches, KFB, K1
Sample knit with Butterfly Cotton on US Size 6 needles
This beautiful lace stitch is very easy to do, and only a two row repeat. As you can see from the picture, this can be knit to slant either to the left or the right. (There is also a pattern for vertical trellis lace, which I will probably post at some point in the future - or sooner if asked!)
Abbreviations used in the pattern:
YO - yarn over
K2tog - knit two together
SSK - slip, slip, knit -- typically you will see instructions tell you to slip the two sts knitwise, which is fine. Myself, I slip the first knitwise and the second purlwise, which I think makes the decrease a bit neater. But it is up to you how you slip the stitches.
Work on an even number of stitches
Right Slant:
Row 1: K1, *YO, K2tog* Repeat from * to last stitch, K1
Row 2: Purl all stitches
Left Slant:
Row 1: K1, *SSK, YO* Repeat from * to last stitch, K1