 |
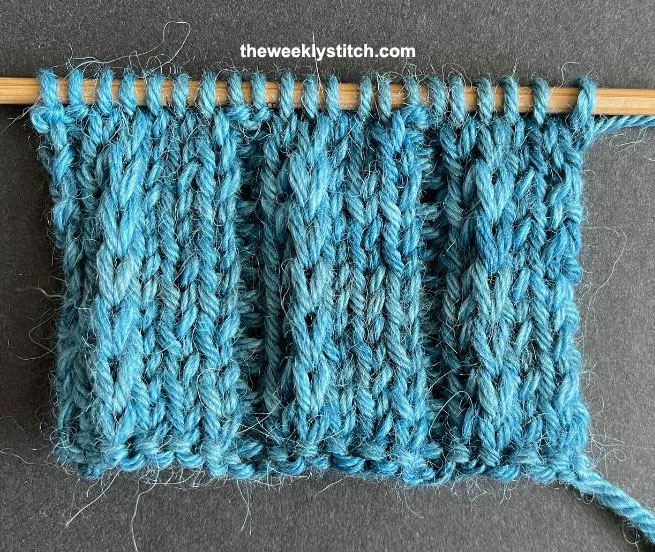
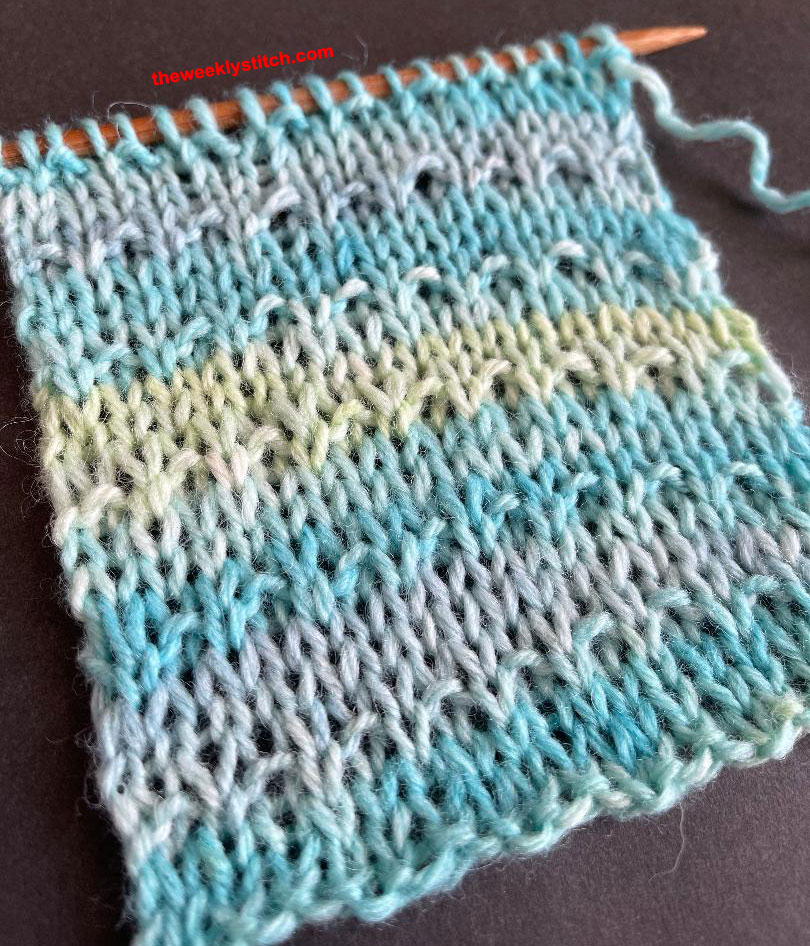
| Sample knit with worsted weight yarn, US 6 needles |
Multiple of 7
Row 1: *k3, sl wyib, k1, p2
Row 2: *k2, p5
Repeat these two rows for the pattern.
Happy Knitting!
|
| Sample knit with worsted weight yarn, US 6 needles |
Row 1: *k3, sl wyib, k1, p2
Row 2: *k2, p5
Repeat these two rows for the pattern.
Happy Knitting!
 |
| Sample knit with worsted weight yarn, US 7 needles |
Multiple of 4 +3
Row 1 (rs): *k3, sl 1 wyib; rep from *, end k3
Row 2: k3 *sl 1 wyif, k3
Row 3: *k1, sl 1 wyib, k2; rep from *, end k1, sl 1 wyib, k1
Row 4: k1, sl 1 wyif, k1 *k2, sl 1 wyif, k1
Repeat these four rows for the pattern.
Happy Knitting!
 |
| Sample knit with worsted weight yarn, US 6 needles |
Multiple of 4+3
Rows 1, 3 and 4 (rs): knit
Row 2: p3 *k1, p3; rep from *
Repeat these four rows for the pattern.
Happy Knitting!
 |
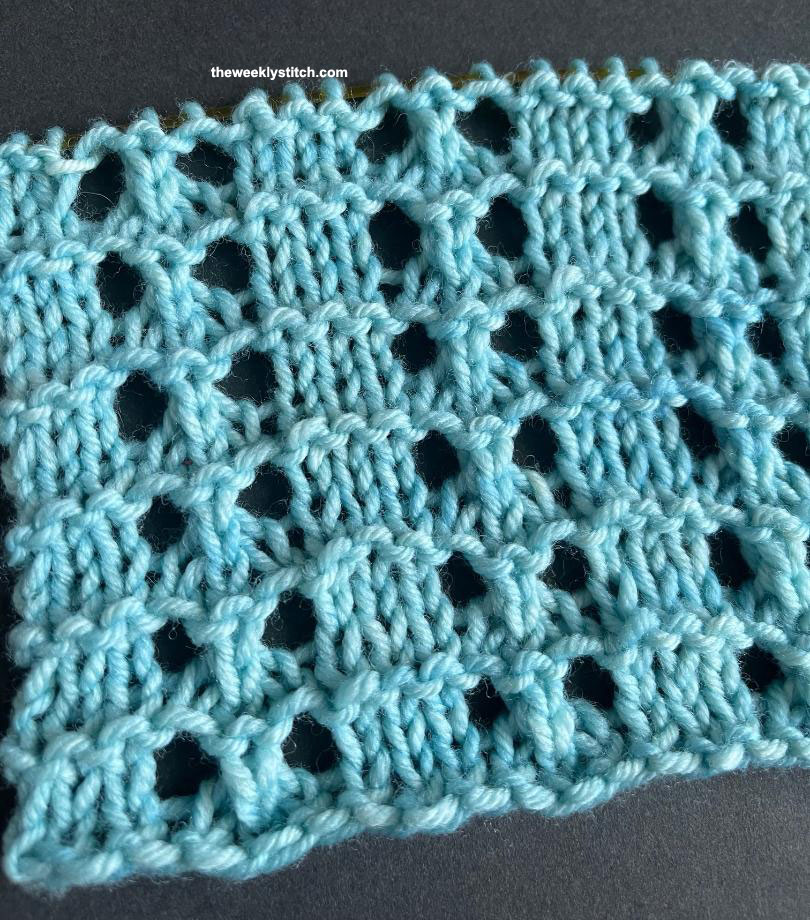
| Sample knit with worsted weight yarn, US 6 needles |
Check out Miniature Leaf Lace I HERE!
Multiple of 6+2
Rows 1 and 3 (ws): purl
Row 2: k1 *k3, yo, sl1-k2tog-psso, yo; rep from *, end k1
Row 4: k1 *yo, sl1-k2tog-psso, yo, k3; rep from *, end k1
Repeat these four rows for the pattern.
Happy Knitting!
 |
| Sample knit with worsted weight yarn, US 8 needles |
 |
| This is the wrong/back side of the fabric |
Multiple of 5+2
Row 1 (rs): p2 *yo, k2togtbl, k1, p2
Row 2: *k2, yo, k2togtbl, p1; rep from *, end k2
Repeat these two rows for the pattern.
Happy Knitting!
 |
| Sample knit with worsted weight yarn, US 7 needles |
 |
| Sample knit with worsted weight yarn, US 6 needles |
Multiple of 2 +1
Row 1 (rs): *p1, k1; rep from *, end p1
Row 2: p1 *sl 1 wyif, p1; rep from *
Row 3: *k1, p1; rep from *, end k1
Row 4: sl 1 wyif *p1, sl 1 wyif; rep from *
Repeat these four rows for the pattern.
Happy Knitting!
 |
| Sample knit with DK weight yarn, US 8 needles |
s2kpo = slip next two stitches together knitwise, k1, pass two slipped stitches together over knit stitch
Multiple of 6 + 3
Row 1 (rs): knit
Row 2: purl
Row 3: *k3, yo, s2kpo, yo; rep from *, end k3
Row 4: knit
Repeat these four rows for the pattern.
Happy Knitting!
 |
| Sample knit with DK weight yarn, US 7 needles |
Row 1 (rs): *p2, k1; rep from *, end p2
Row 2: *k2, p1; rep from *, end k2
Row 3: p1 *sl3 wyif, p1, k1, p1; rep from *, end sl3 wyif, p1
Row 4: k1, sl3 wyib *k1, p1, k1, sl3 wyib; rep from *, end k1
Row 5: *p2, k1; rep from *, end p2
Row 6: *k2, p1; rep from *, end k2
Row 7: p1 *p1, k1, p1, sl3 wyif; rep from *, end p1, k1, p2
Row 8: k2, p1, k1 *sl3 wyib, k1, p1, k1; rep from *, end k1
Repeat these 8 rows for the pattern.
Happy Knitting!
 |
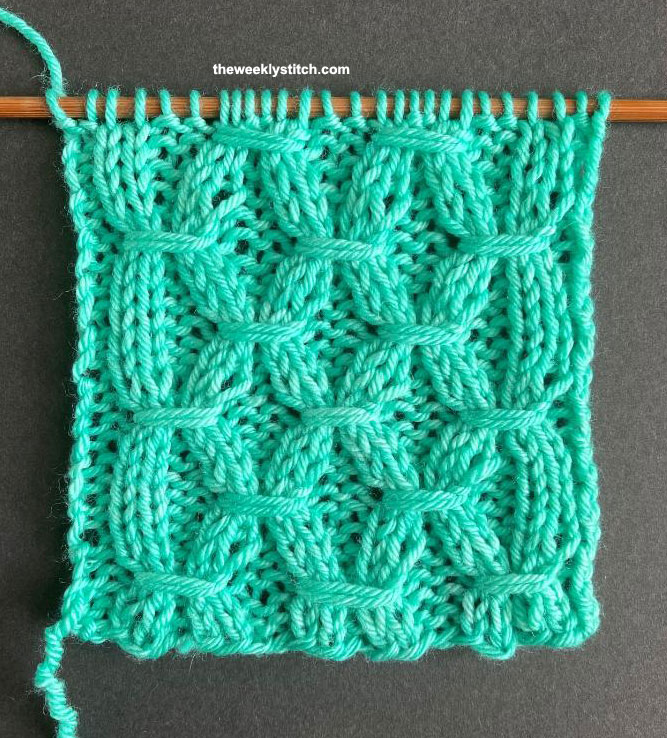
| Sample knit with worsted weight yarn, US 7 needles |
Special Stitches:
TW2 - twist two stitches - k2tog, leaving stitches on left needle, then knit the first stitch again, and drop both stitches from left needle
CR3 - cross three stitches - k3tog, leaving stitches on left needle, then knit first and second stitches together, leaving stitches on left needle, finally knit the first stitch and drop all stitches from left needle
Row 1: k2 *(TW2)3x, k2; rep from *
Rows 2 and 4: purl
Row 3: k2 *(CR3)2x, k2; rep from *
Repeat these four rows for the pattern.
Happy knitting!
 |
| Sample knit with DK weight yarn, US 8 needles |
Row 1 (rs): *p3, (k1, yo, k1) into next stitch; rep from *, end p3
Row 2: *k3, p3; rep from *, end k3
Row 3: *p3, k3tog; rep from *, end p3
Row 4: knit all stitches
Repeat these four rows for the pattern.
Happy Knitting!
 |
| Sample knit with worsted weight yarn, US 6 needles |
Row 1 (rs): *p1, k1, yo, k2, yo, k1
Row 2: *p6, k1
Row 3: *p1 (sl pwise, k2, psso the 2 knits) twice
Row 4: *p4, k1
Repeat these four rows for the pattern.
Happy Knitting!
 |
| Sample knit with worsted weight yarn, US 7 needles |
Multiple of 4 + 2
Row 1: *k3, p1; rep from *, end k2
Row 2: p1 *k3, p1; rep from *, end k1
Repeat these two rows for the pattern.
Happy Knitting!
 |
| Sample knit with DK weight yarn, US 7 needles |
 |
| The back of this stitch looks nice too. |
Multiple of 8 + 2
Row 1 (ws): k2 *p2, k2
Row 2: p2 *k2, p2
Row 3: k2 *p2, k2
Row 4: p2 *pull up a loop between the 6th and 7th sts and place on left needle, then knit loop together with the next stitch on left needle, k1, p2, k2, p2
Row 5: k2 *p2, k2
Row 6: p2 *k2, p2
Row 7: k2 *p2, k2
Row 8: p2, k2, p2 *pull up a loop between the 6th and 7th sts and place on left needle, then knit loop together with the next stitch on left needle, k1, p2, k2, p2; rep from *, end k2, p2
Repeat these 8 rows for the pattern.
Happy Knitting!
 |
| Sample knit with DK weight yarn, US 8 needles |
Row 1 (rs): knit
Row 2: purl
Row 3: k3 *slip 4 sts knitwise, k1, pass each sl stitch over the knit stitch, k1; rep from *, end k3
Row 4: p3 *(p1, k1, p1, k1, p1) into next stitch, p1; rep from *, end p3
Row 5: knit
Row 6: purl
Row 7: slip 4 sts knitwise, k1, pass each sl stitch over the knit stitch *k1, slip 4 sts knitwise, k1, pass each sl stitch over the knit stitch; rep from *
Row 8: (p1, k1, p1, k1, p1) into next stitch *p1, (p1, k1, p1, k1, p1) into next stitch; rep from *
Repeat these 8 rows for the pattern.
Happy Knitting!
 |
| Sample knit with DK weight yarn, US 6 needles |
Multiple of 4 + 2
Row 1 (ws): purl
Row 2: k1 *insert right needle from behind under the strand between the stitch just knit and the next stitch on left needle, creating an extra stitch, k2, then pass the extra stitch over the 2 sts just knit, k2; rep from *, end k1
Row 3: purl
Row 4: k3 *insert right needle from behind under the strand between the stitch just knit and the next stitch on left needle, creating an extra stitch, k2, then pass the extra stitch over the 2 sts just knit, k2; rep from *, end k1
Repeat these four rows for the pattern.
Happy Knitting!
 |
| Sample knit with DK weight yarn on US 6 needles |
Multiple of 2
Row 1 (rs): k1 *knit each stitch, wrapping the yarn twice; rep from *, end k1
Row 2: k1 * slip next two stitches to the right needle, dropping the extra wraps; with left needle, pick up the second stitch on the right needle and pass it over the first and place on left needle. Then insert the tip of the left needle into the front leg of the stitch on the right needle and knit through the back loop. Knit next stitch on left needle; rep from *, end k1
Repeat these two rows for the pattern. Below are some photos and the video of how this stitch is worked. Happy Knitting!
 | |||
with left needle, pass the second stitch on the right needle over the first
|

 |
| Sample knit with DK weight yarn on US 6 needles |
Cast on any number of stitches
Set up row: k1 *knit each stitch, wrapping yarn twice; rep from *
Row 1: knit the first loop only of the first stitch, leaving second loop on the left needle *knit second loop of previous stitch together with first loop of next stitch, wrapping the yarn twice, leaving the second loop on the left needle; rep from *
Repeat Row 1 for the pattern.
Before binding off, you will need to decrease. Knit the first stitch, then k2tog to the end of the row. You will only be wrapping the yarn once, making normal k2tog stitches. After this row, you should have the same number of stitches you started with and can bind off.
Happy Knitting!
 |
| Sample knit with worsted weight yarn, US 7 needles |
For my sample, I added extra stitches for garter stitch edges; these extra stitches are not included in the instructions below. If you're interested in the cable needle I use in the video, you can follow this amazon affiliate link: Brittany Cable Needles
CN = cable needle
LN = left needle
Multiple of 7 + 3
Row 1 (rs): *p3, k4; rep from *, end p3
Rows 2, 3, 4 and 6: work each stitch as it appears - knit the knits, purl the purls
Row 5: *p3, slip 2 sts to CN and hold in front; k2 from LN, then k2 from CN; rep from *, end p3
Repeat these six rows for the pattern.
Happy Knitting!
 |
| Sample knit with worsted weight yarn, US 7 needles |
For my sample, I added extra stitches for garter stitch edges; these extra stitches are not included in the instructions below. If you're interested in the cable needle I use in the video, you can follow this amazon affiliate link: Brittany Cable Needles
CN = cable needle
LN = left needle
Multiple of 7 + 3
Row 1 (rs): *p3, k4; rep from *, end p3
Rows 2, 3, 4 and 6: work each stitch as it appears - knit the knits, purl the purls
Row 5: *p3, slip 2 sts to CN and hold in back; k2 from LN, then k2 from CN; rep from *, end p3
Repeat these six rows for the pattern.
Happy Knitting!
 |
| Sample knit with worsted weight yarn on US 6 needles |
This cable is worked over 16 stitches. For my sample, I added extra stitches for garter stitch edges and a reverse stockinette stitch background. The instructions below are for the 16 stitches used in the cable only. If you're interested in the cable needle set I use in the video, you can follow this amazon affiliate link: Brittany Cable Needles
CN = cable needle
LN = left needle
Row 1 (rs): knit
Row 2: purl
Row 3: slip 4 sts to CN and hold in back; k4 from LN, then k4 from CN; slip 4 sts to CN and hold in front; k4 from LN, then k4 from CN
Row 4: purl
Row 5: knit
Row 6: purl
Row 7: knit
Row 8: purl
Repeat these 8 rows for the cable pattern.
 |
| Sample knit with fingering weight yarn, US 6 needles |
Depending on how you plan to use the stitch, you may want to consider adding extra stitches to neaten up the edges.
Stitches are slipped knitwise.
Multiple of 4+5
Row 1 (rs): *k1, yo, sl 1, k2tog, psso, yo*; rep from *, end k1
Rows 2 and 4: purl all stitches
Row 3: k2tog, yo, *k1, yo, sl 1, k2tog, psso, yo; rep from * to last 3 stitches, end k1, yo, sl 1, k1, psso
Repeat these four rows for the pattern.
Happy Knitting!
 |
| Sample knit with worsted weight yarn, US 8 needles |
**The slipped stitch in Row 1 should be slipped knitwise
Multiple of 6 + 1
Row 1 (rs): *k1, sl 1, k1, psso, yo, k1, yo, k2tog; rep from *, end k1
Row 2: p1 *p2, k1, p3; rep from *
Repeat these two rows for the pattern.
Happy Knitting!
 |
| Sample knit with worsted weight yarn, US 6 needles |
Depending on how you plan to use the stitch, you may want to add a couple of extra stitches to neaten up the edges.
Multiple of 4+2
Row 1 (rs): *k2, sl 2 wyif; rep from *, end k2
Row 2: purl
Row 3: *sl 1 wyif, k2, sl 1 wyif; rep from *, end sl 1 wyif, k1
Row 4: purl
Row 5: *sl 2 wyif, k2; rep from *, end sl 2 wyif
Row 6: purl
Repeat these six rows for the pattern.
Happy Knitting!
 |
| Sample knit with worsted weight yarn, US 7 needles |
Row 1 (rs): *k2, p3; rep from *, end k2
Row 2: *p2, k3; rep from *, end p2
Row 3: *k2, p3; rep from *, end k2
Row 4: knit all stitches
Repeat these four rows for the pattern.
Happy Knitting!
 |
| Sample knit with DK weight yarn, US 7 needles |
Multiple of 2+1
Row 1 (rs): *p1, sl wyib; rep from *, end p1
Row 2: purl
Row 3: *sl wyib, p1; rep from *, end sl wyib
Row 4: purl
Repeat these four rows for the pattern.
Happy Knitting!
 |
| Sample knit with worsted weight yarn, US 8 needles |
Multiple of 5 + 4
Row 1 (rs): knit
Row 2: p4, *k1, p4
Row 3: knit
Row 4: p4, *k1, p4
Row 5: knit
Row 6: knit
Repeat these six rows for the pattern.
Happy Knitting!

The video for this week is actually a cast on. This is also posted on sapphiresnpurls.com, where you can find more info about this cast on if you're interested, or you can just watch the video below.
Happy Knitting!
 |
| Sample knit with worsted weight yarn, US 8 needles |
When slipping, slip purlwise
Multiple of 2
Row 1 (rs): *sl 1 wyib, k1, yo, psso both the knit stitch and yo
Row 2: purl
Row 3: k1 *sl 1 wyib, k1, yo, psso both the knit stitch and yo; rep from *, end k1
Row 4: purl
Repeat these four rows for the pattern.
Happy Knitting!

The stitch video for this week is actually a cast on. This is also posted on sapphiresnpurls.com, where you can find more info on this cast on if you're interested, or you can just watch the video below.
Happy Knitting!
 |
| Sample knit with DK weight yarn on US 7 needles |
Multiple of 4+1
Row 1 (rs): *k2, p1, k1; rep from * to last st, k1
Row 2: p1 *k3, p1; rep from *
Repeat these two rows for the pattern.
Happy Knitting!
 |
| Sample knit with worsted weight yarn, US 6 needles |
Rows 1 and 3 (rs): *k2, p1; rep from * to last 2 sts, k2
Row 2: *p2, k1; rep from * to last 2 sts, p2
Row 4: knit all sts
Repeat these four rows for the pattern.
Happy Knitting!
 |
| Sample knit with worsted weight yarn on US 8 needles |
Row 1 (rs): *k3, p1, k1; rep from * to last 2 sts, k2
Row 2: p2 *k1, p1, k1, p2; rep from*
Repeat these two rows for the pattern.
Happy Knitting!
 |
| Sample knit with worsted weight yarn, US 6 needles |
Multiple of 5 + 2
Row 1 (ws): k2 *p3, k2; rep from *
Row 2: p2 *k1, yo, ssk, p2; rep from *
Row 3: k2 *p3, k2; rep from *
Row 4: p2 *k2tog, yo, k1, p2; rep from *
Repeat these four rows for the pattern.
Happy Knitting!
 |
| Sample knit with worsted weight yarn on US 6 needles - FRONT |
 |
| BACK |
Multiple of 6
Pattern begins on the right side
Rows 1 and 3: *k1, p4, k1; rep from *
Row 2: *p1, k4, p1; rep from *
Rows 4 and 8: purl
Rows 5 and 7: *p2, k2, p2; rep from *
Row 6: *k2, p2, k2; rep from *
Repeat these 8 rows for the pattern
Happy Knitting!
 |
| Sample knit with worsted weight yarn on US 8 needles |
Multiple of 8+2
Row 1 (ws): *k2, yo, p6, yo; end k2
Row 2: *p2, yo, k8, yo; end p2
Row 3: *k2, yo, p10, yo; end k2
Row 4: purl all stitches
Row 5: *k2, then k12, wrapping each stitch 3 times; end k2
Row 6: *p2, (slip 2 sts, unwrapping extra loops, then slip 2 long sts back to left needle and k2tog)x6; end p2
Repeat these six rows for the pattern.
Happy Knitting!
 |
| Sample knit with DK yarn on US 6 needles |
Multiple of 9+2
Row 1 (rs): *p2, k7; end p2
All EVEN Rows: 2, 4, 6, 8, 10, 12, 14: knit the knits, purl the purls, and purl the yo's
Row 3: *p2, k1, yo, ssk, k4; end p2
Row 5: *p2, k2, yo, ssk, k3; end p2
Row 7: *p2, k3, yo, ssk, k2; end p2
Row 9: *p2, k4, yo, ssk, k1; end p2
Row 11: *p2, k5, yo, ssk; end p2
Row 13: *p2, with right needle, draw up a loop from each of the yarn overs from previous rows, k1, then pass the five loops over the k1, k6; end p2
Repeat these 14 rows for the pattern.
Happy Knitting!
 |
| Sample knit with worsted weight yarn on US 7 needles |
Multiple of 2 + 1
Row 1 (rs): knit all sts
Row 2: purl all sts
Row 3: knit all sts
Row 4: p1 *k1, p1
Row 5: knit all sts
Row 6: purl all sts
Row 7: knit all sts
Row 8: k1 *p1, k1
Repeat these 8 rows for the pattern.
Happy Knitting!
 |
| Sample knit with worsted weight yarn, US 6 needles |
This edging is worked lengthways.
Note that you will want to end your last repeat on Row 3 once the edging is long enough. I use the cable cast on for Row 4, but the knitted cast on will also work.
Cast on 3
Rows 1, 2 and 3: sl, k2
Row 4: Cast on 6 sts, bind off same 6 sts. You should have one stitch on the right needle and two on the left; k2
Repeat these 4 Rows for the pattern.
Happy Knitting!
 |
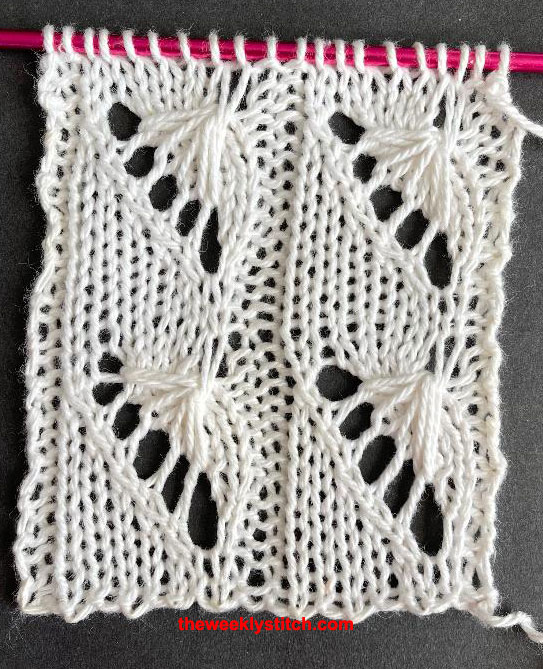
| Sample knit with fingering weight yarn, US 7 needles |
 |
| Sample knit with worsted weight yarn, US 8 needles |
 |
| And here are both - each sample is six repeats of the pattern. Hopefully you can see the difference in size between yarn weights. You don't need to use light weight yarn to knit beautiful lace! |
I copied this off from an old newspaper; unfortunately the name and edition date of the newspaper do not show on the copy. I have a lot of stitches saved from a paper out of New York from the late 1800's, so my best guess is that this particular lace comes from an edition of that paper.
A note as to Row 4 - the instructions for Row 4 begin as follows:
"Slip the first stitch, knit the second and slip the first one over the second, leaving only one stitch on the needle. Knit the next stitch and bind it off in the same manner. Continue this binding off until there are but fourteen stitches on the left hand needle, which, with one on the other will make fifteen stitches, the number started with."
I tried Row 4 with the first stitch slipped and also knitted as I show in the video. I don't think it makes any difference whether or not the first stitch is slipped, at least I didn't see any. Also, you will be binding off 4 stitches - unless you've made an error in a previous row, binding off 4 stitches should leave you with the required 15.
Cast on 15 stitches
Knit one row - this set up row is not repeated
Row 1: k3, yo, k2tog, k3, yo, k1, yo, k6
Row 2: k6, yo, k3, yo, k2tog, k3, yo, k2tog, k1
Row 3: k3, yo, (k2tog) twice, yo, k5, yo, k6
Row 4: Bind off 4 stitches - you should have 14 sts on the left needle and 1 on the right - k1, yo, k2tog, k3, k2tog, yo, k2tog, k1, yo, k2tog, k1
Row 5: k3, yo, k2tog, k1, yo, k2tog, k1, k2tog, yo, k3
Row 6: k3, yo, k1, yo, s2kpo, yo, k4, yo, k2tog, k1
Repeat these 6 Rows for the pattern.
 |
| Sample knit with DK yarn, US 6 needles |
